 |
 | Mazda RX7 Conversion |  | Ian Hooper, 2012 | |
Licensing and Testing
Licensing
Now that the vehicle is basically complete (December 2012), the next step is to get it licensed. To review the basic procedure for getting an EV conversion correctly licensed here in Western Australia (probably similar in other states):
- Complete a Modification Application before you start
- Convert the vehicle according to NCOP14 standards
- Complete the checklist at the back of NCOP14 and submit to the licensing department, including any inspections / signoff by engineers and/or recognised signatories as required.
- Get the vehicle weighed at an approved weighbridge.
- A couple of weeks later you should receive your NCOP14 approval, and can book an inspection at your nearest licensing centre (remember to take all documents with you). The licensing centre will only be checking things like lights/brakes/roadworthiness, as the electric side should already be checked and approved.
If the vehicle's license has lapsed during conversion, you will need to obtain a Temporary Movement Permit to drive the vehicle to the inspection centre, or any weighbridge/workshop/etc. If the vehicle's license is current, it is OK to drive the vehicle but it should certainly be in roadworthy condition, and you are at risk of a yellow sticker if you get pulled up (due to unregistered modifications).
Testing
In this section I will discuss any issues that arise during use and review the performance achieved by the vehicle.
The video below shows the RX7's first ever test drive from 29th October 2012 - the first time the car had moved in six months! It was only running off the rear battery pack and I was being extremely gentle with the throttle, but the first test drive is still a great milestone to enjoy, and a big relief to verify that the drivetrain ran smoothly.
So far only one problem has been encountered during test drives, which is the Zilla controller flagging an error and shutting down due to a low 12V battery. I suspect it's a case of the power steering sometimes causing an excessive load and hence voltage sag on the 12V system. A couple of possible solutions are to put in a more powerful 12V battery, or bump up the voltage output from the IOTA DC/DC converter so it does a bit more of the work.
Another option I am considering is to add a current limiting controller to the power steering pump, which could also let me slow the P/S pump down in proportion with vehicle speed (since power steering is only really required for low speed maneouvers). This would improve vehicle efficiency, since the P/S pump otherwise draws about 250W minimum at all times.
14th January 2013 Update
This is the first of probably many quick updates on how the car has been going. Firstly, that low-12V Zilla error hasn't reoccurred, and in hindsight I suspect it was just been a low 12V battery (since the car had been sitting unused for a while).
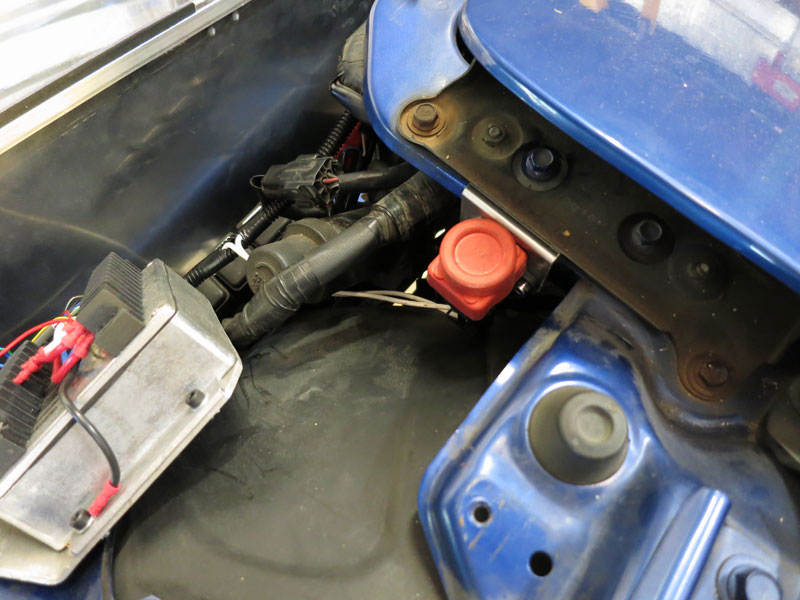
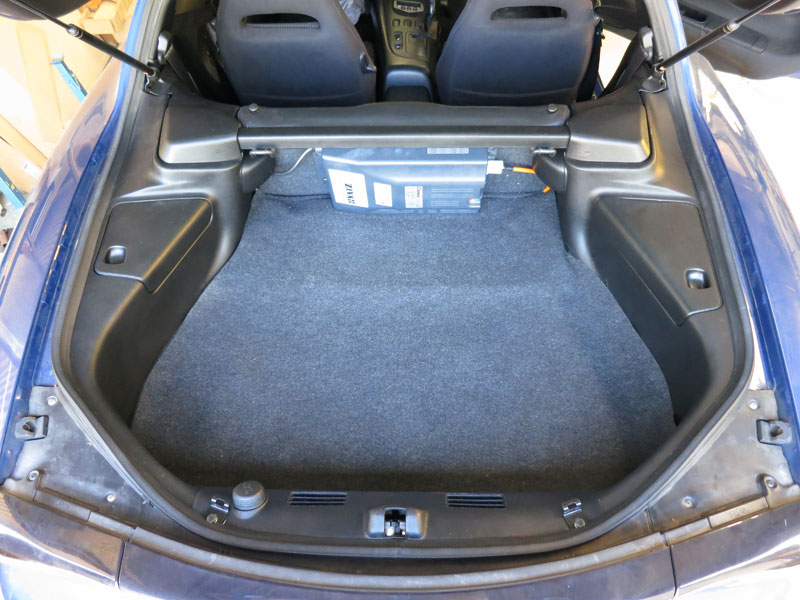
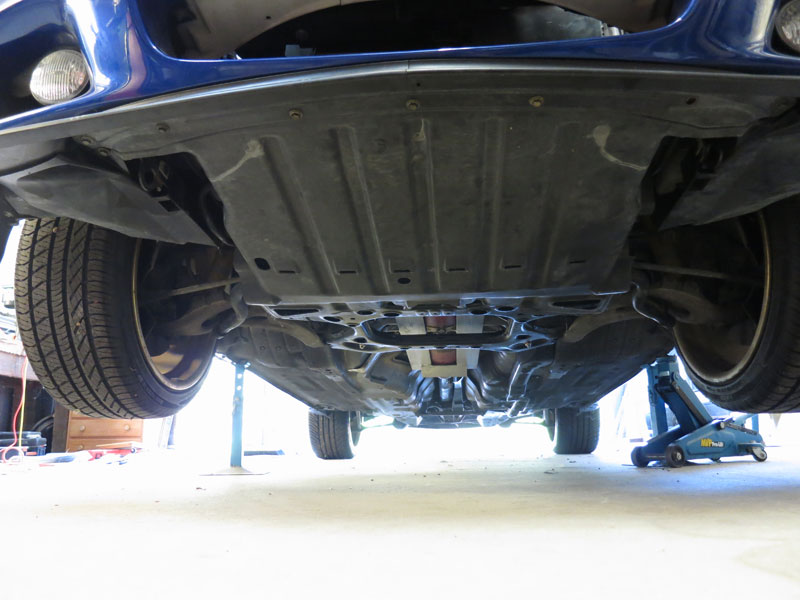
Just before Christmas I reached that nice milestone where I could say the car was "finished". There are a few things I plan to add, but at that point it was fully drivable, roadworthy (I think), and ready to start the licensing process. I reviewed NCOP14 again and identified a few things I needed to add/improve. I'd forgotten to add an inertia switch / crash sensor. I installed this down near the EVMS. Ideally it should be further back mounted to the firewall or A-pillar so it's less susceptible to vibration - perhaps I'll move it later. I also reinstalled all the rear boot area panelling, which are required to cover up the HV terminals on the rear contactor, fuse and charge relay(s) so they can't be touched. And also the front splash guard went back on, which isn't a legal requirement but will help keep water out of the engine bay.
On Thursday 10th Jan I got a temporary movement permit and drove the car out to EV Works for its final inspection, weighing, and filling out the NCOP14 paperwork. It was the car's first foray on public roads, not an inconsiderable distance (about 70K round trip) mostly at highway speed, and having built the car I was fully aware of how many possible faults there could be! So I was a little nervous. But fortunately the car behaved flawlessly the whole way there.
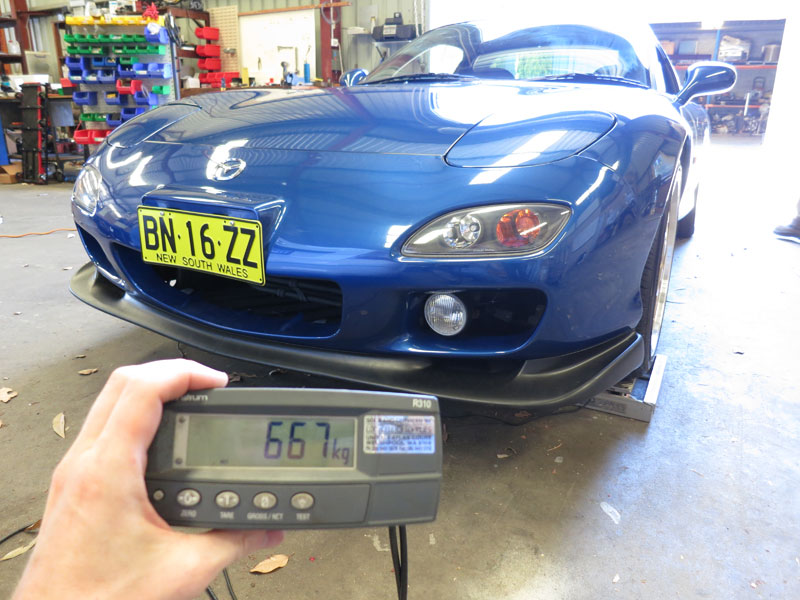
First job at EV Works was to get the car weighed on their load cells. This is done separately for front and rear wheels to also get axle loading / weight balance. The front came out at 667kg (27kg up) and the rear 706kg (61kg up), for a total 88kg increase. It's a little more than I had hoped, particularly over the rears, but hopefully a 7% increase won't trouble the licensing department and the weight balance is still pretty good (48.6 : 51.4).
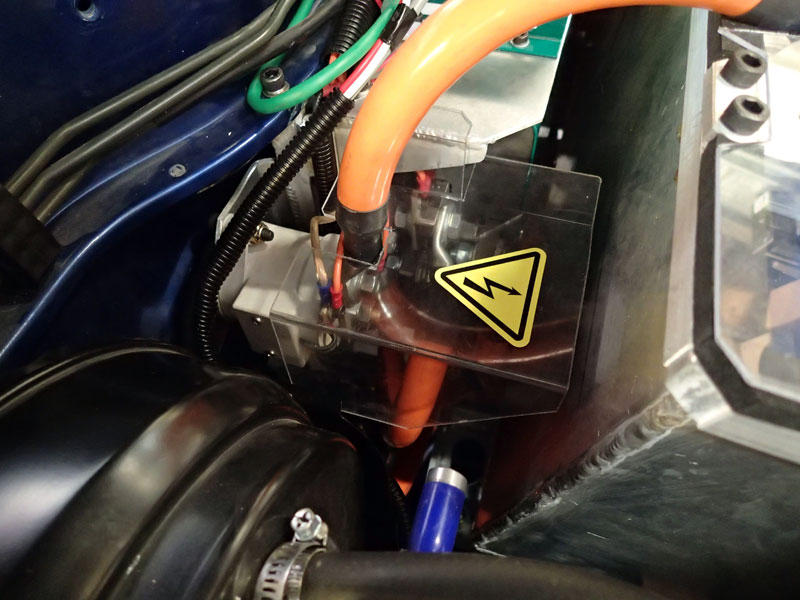
Generally the inspection went well. Rob suggested a couple of covers over the exposed HV terminals and fuse block near the motor controller to comply with NCOP14's requirements (that you can't stick your fingers on any exposed HV). Then we proceeded to fill out the NCOP paperwork which I have to send to the licensing department to pre-approve the electric stuff before taking the car to "the pits" (since the inspectors there aren't trained in electric vehicle standards etc).
With the paperwork done, I headed home. Unfortunately the Zilla started playing up on the way home! It would cut out while I was cruising along, and I'd have to pull over. Nothing appeared to be damaged or overheating, then I'd try the key and it would work again for a few more K's, but the cutouts got more frequent until about 5Ks from home it just wouldn't go anymore, and I had to get a tow the rest of the way.
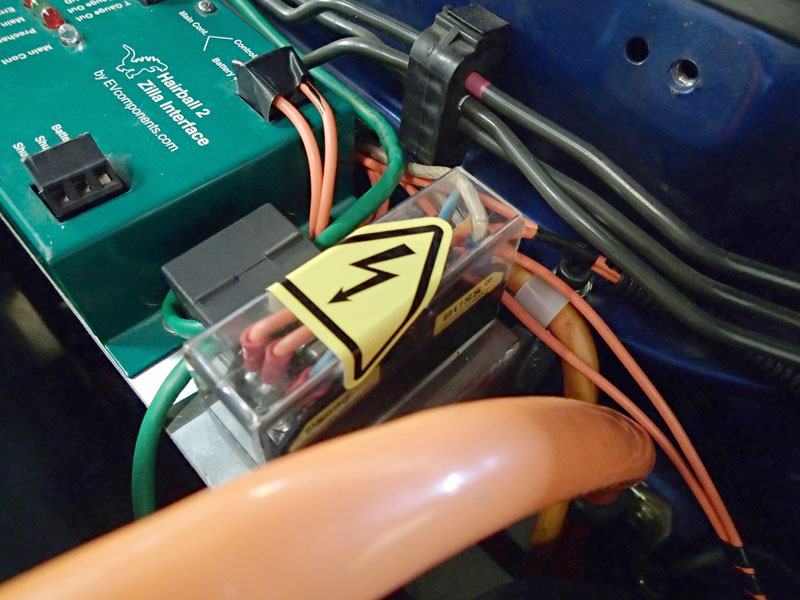
When I got home I connected the laptop to the Zilla and checked the error codes - primarily 1133: Lost comms with controller, 1132: Controller did not communicate during precharge, i.e problems with communications between the Hairball (control box) and power box. Some small consolation that it wasn't a fault with my workmanship, but still sad for the car to be out of action so soon. I sent an email to Zilla support at Manzanita Micro, describing the problem and asking for advice.
The following day Rob Mason from EV Works stopped by with a spare hairball and comms cable. We swapped the cable and no change was observed. But swapping the Hairball seemed to resolve the problem completely, implicating damage to the comms electronics in my Hairball. So I'll have to send the Hairball back to Manzanita for repairs. (I'm glad the power box seems OK, because that would be far more troublesome to remove and ship back!)
So the car is back up and running on a borrowed Hairball, and now I'm playing the waiting game while the Department of Transport processes my NCOP14 paperwork, which usually takes a few weeks.
|
Some more ramblings on what's been happening with the RX7 lately..
First the big news: The RX7 is now officially road legal and licensed as an EV! The licensing process was inordinately troublesome and took a lot longer than I would have liked due to various problems cropping up along the way, but it is a great milestone and a bit of a relief to have that sorted.
Pictured right is the vehicle parked up in the garage, charging up and wearing its new number plates. |
|

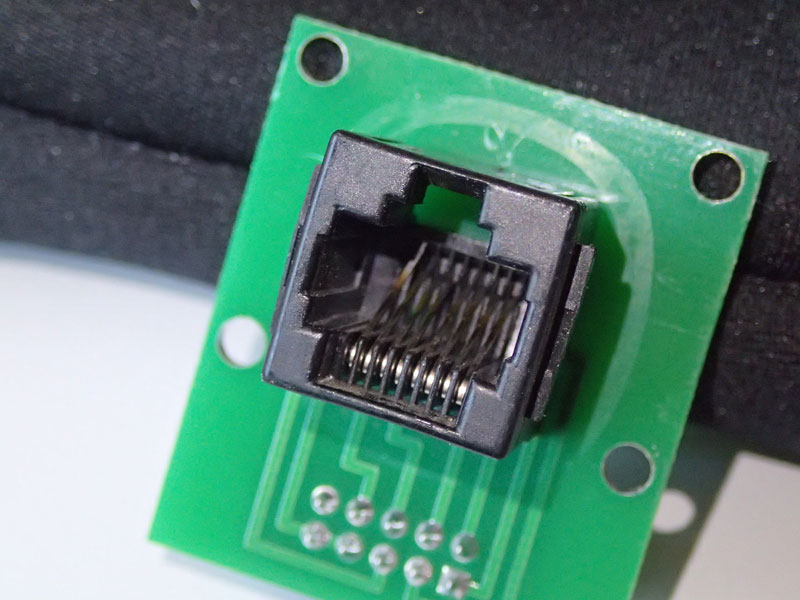
Damaged pin in Zilla's RJ45 connector
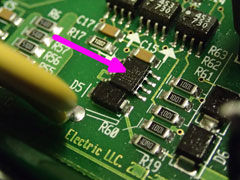
Tiny damaged line driver chip in Zilla
|
Zilla Repairs
One of the problems of course has been the Zilla controller fault. I was keen to try diagnosing and/or fixing the problem here in Perth, instead of sending it back to Manzanita Micro for repairs, to avoid what was going to be a $500 round trip in shipping alone! After much liaising with Manzanita and Otmar Ebenhoech (designer of the Zilla controllers) – who were all very helpful, I should add – I discovered what appeared to be a damaged pin on the RJ45 port, which may have been making intermittent contact and/or shorting out the adjacent pin.
So I replaced the RJ45 socket, but the controller still didn't work. Otmar did some investigation and deduced that a crossed pin there could have been shorting out a line driver IC inside the controller. The chip didn't appear damaged, but there aren't always external signs, so we figured replacing it was worth a shot. He provided the name of the part and I ordered some from Digikey, which arrived a few days later.
Meanwhile, to rule out the possibility of a problem with my install rather than the Zilla itself, I took my Z2K power box up to EV Works, who had another vehicle running a Z2K. We swapped them over and confirmed that my Zilla did not work in that vehicle either. I then replaced the suspect line driver IC and we tried it again in EV Works' vehicle – and Hallelujah, it worked! So in the end the repair only cost a few dollars worth of components and I avoided sending it back to the US, though it did cost me a couple of months' downtime.
|
AEVA Electrakhana
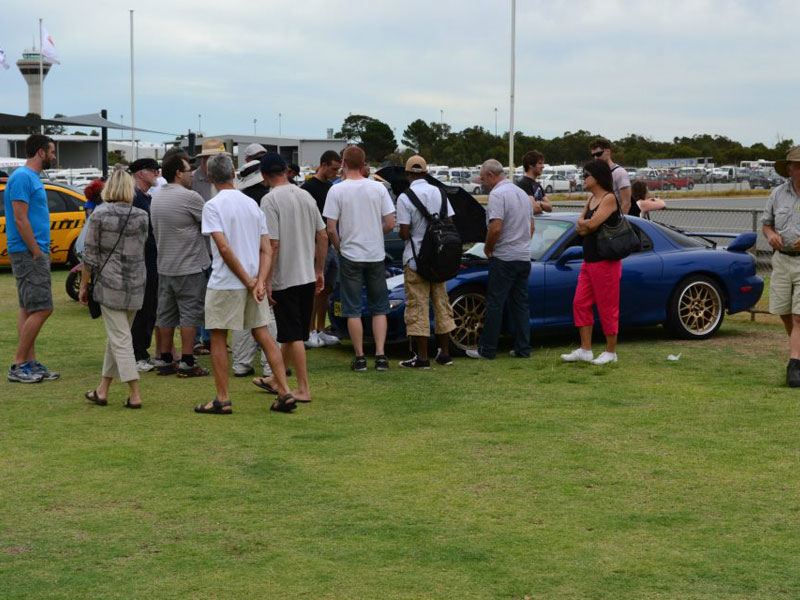
On 10th March, the Perth branch of AEVA held its annual "Electrakhana", an expo and track day dedicated to electric vehicles held at the RAC Driving Centre. Since my Zilla was still out of action at the time, Rob Mason from EV Works kindly loaned me a spare Z1K so I could get the car there. It was a pretty successful event with most of the interesting EV conversions from around Perth on display, some production electrics (Nissan Leaf, Mitsubishi iMiEV), and EVs being test-driven out on the track non-stop all day. A couple of pictures from the event below. Altogether a fun day out. (Photos courtesy of Coulomb Motorsport)
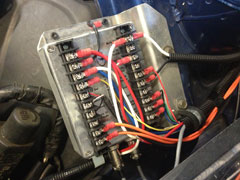
12V battery
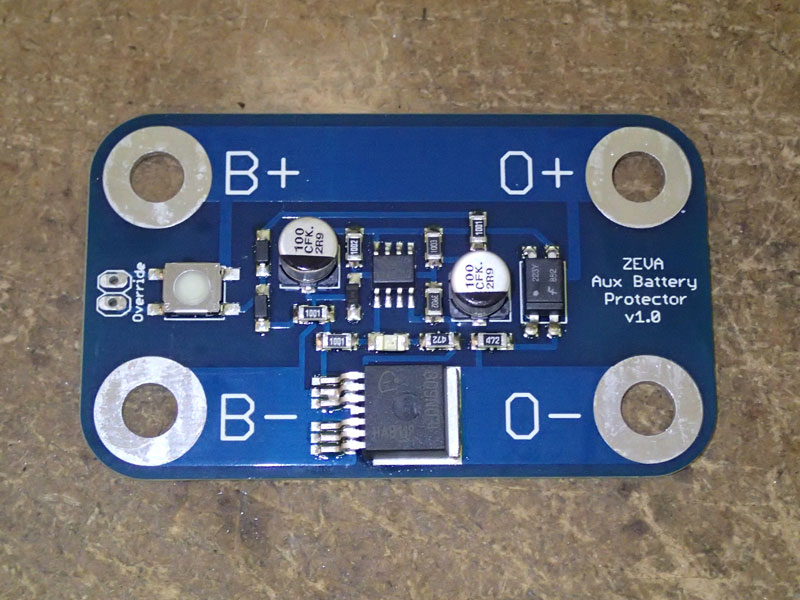
With the car sitting around so much, the 12V battery kept going flat. I measured about a 200mA discharge while the car was off, certainly not an inconsiderable discharge rate, made all the worse by the fact that I had downsized my 12V battery significantly. Unfortunately the K2 pack I built didn't seem to like being repeatedly flattened all the way to 0 (or near enough) and soon suffered a cell failure. I replaced it with 4x Headway cells, making an even smaller 10Ah pack (!), and just got in the habit of disconnecting the battery when not in use.
This is obviously not a long term solution, so I investigated low-voltage cutouts which are designed to isolate the battery automatically if it's voltage gets too low, to avoid over-discharging it. The commercial options all seemed overpriced, so I designed my own. Pictured right is the first prototype – I'll start testing it in the car shortly. |
|
Charger voltage
The charger was set for a peak voltage of 328VDC, which with my 88 series cells would work out at 3.73V per cell if the pack was perfectly balanced. But of course it isn't, so there was always a cell exceeding the 3.8V threshold of the battery monitors which were forcefully shutting down the charger. It is generally considered bad practice to rely on the BMS to stop the charger as it removes the redundant safety – a BMS should be the last line of defence and only take action if something has gone wrong. So I turned the charger down to about 310V, which meant the charger was automatically tapering off its current and ending the charge itself without the BMS intervening.
The Zivan NG3 chargers are "sort of" user adjustable. You have to open up the case and adjust a tuning pot inside. Rod Dilkes from EV Power put together this handy instruction guide on how to do it.
Speedometer and drive coupling
During one test drive, the speedometer suddenly stopped working. The speedometer sensor is mounted in the end of the gearbox section and is driven by a worm gear on the output drive shaft. It is an inductive sensor which provides differential pulses over a pair of wires to the gauge in the dash.
After some investigation, it turned out the speedo fault was a warning sign of a more serious problem: The coupling between the motor and tailshaft was coming apart! The speedometer had stopped working because the worm gear was no longer aligned with the sensor drive gear. Some small consolation that it wasn't something I'd done wrong in construction (I outsourced the coupler) but it was a troublesome thing to fix, under the car in the middle of the drivetrain! The shaft had worked its way out about 15mm, and 3 out of 4 grub screws had loosened off. After removing the tailshaft and gearbox housing, I knocked the shaft back in, re-tightened the grub screws holding the keyway in place (including Loctite this time), and added a couple of tack welds between the coupler and shaft just to stop the shaft coming out again.
The keyway is meant to take all the drive torque of course, but if there's any play there and the tack welds get exposed to much/any drive torque, they'll probably break pretty quickly. But I figured it was worth a shot as an extra precaution. Time will tell if this fix holds - that coupling and keyway will be subjected to some pretty serious torque. |
|
Licensing
The first inspection of the vehicle for licensing was actually done shortly after Electrakhana, using the Z1K controller borrowed from Rob Mason. Generally the inspection went well and the inspectors were impressed with the conversion (they don't see a lot of EVs yet), but they did pick up a few small faults which I had to fix before licensing:
- Not allowed aftermarket HID headlights (came with the car as purchased, but not legal in WA)
- Needed an official weighbridge certificate (load cell measurements weren't sufficient)
- Forward/reverse switch needed labelling (e.g a sticker next to the switch)
- Vehicle should only start in Neutral
The last point is a bit contentious because it's not something they've asked for in the past with EVs, but seems like it is going to become a requirement for EV conversions in future. The intention of course is to make sure people don't start the car and have it start moving unexpectedly without them deliberately selecting a gear/direction. Fortunately my Forward/Reverse switch also has a centre-off position for neutral, so I set up a normally-closed relay to break the key start signal to the Zilla if the F/R switch was not in neutral.
The speedometer/drive coupling problem above cropped up shortly after the first inspection which caused me to miss the original re-inspection booking. Instead, the reinspection went ahead today and to my great relief, the car passed.
Future Improvements
Some of the improvements I have planned include:
- Installing some instrumentation - probably a Fuel Gauge Driver Plus for starters.
- "ELECTRIC" signage on the doors and rear window.
- Perhaps design a controller for the power steering motor, to automatically reduce assistance when the vehicle is at speed.
- Put the other 8kWh worth of batteries in.
- Once I'm confident that everything is running well, turn the Zilla up to its full 2000A and see what breaks!
1st November 2013 Update
|
It's been a while since my last update so I thought I'd write up the latest news. The months which followed the last post were unfortunately plagued with ongoing problems with both the drive coupling and Zilla controller. Firstly the drive coupling failed again, quite soon after my first repair (the tack welds broke and the coupling came apart the same way again), so I decided I'd better get a whole new (stronger) one made. I enlisted High Speed Engineering to fabricate one on their CNC machines.
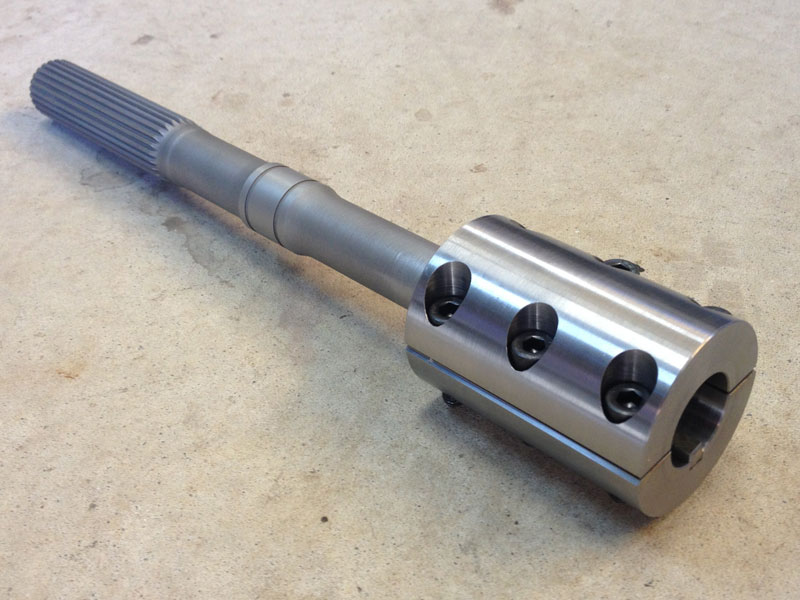
It was made as a clamshell design which clamps onto the two shafts from opposite sides, holding everything tightly in place with six high tensile M8 bolts. The bores were undersized by "a thou or so" in order to make it a tighter interference fit when clamped up. The accuracy of CNC lathes sure is impressive! They also cleaned up the surface and keyway on the output shaft. Picture of the new coupling to the right. So far the new drive coupler has worked a treat.
| 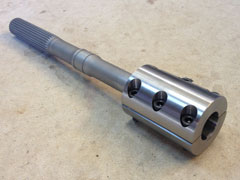
New CNC'd drive coupling
|
Also soon after my last post, I took the Zilla controller out again and bit the bullet - shipping the whole lot back to Manzanita Micro for repair. They were able to reproduce the fault and ended up simply replacing the whole logic board in the power box, which wasn't very expensive ($70 board plus an hour of labour), but the round-trip shipping cost of nearly $500 was a bit painful!
By this time I confess I was pretty annoyed at the Zilla, so resolved to have a go building my own controller for it. With the front battery pack out, I first took the opportunity to do some road testing of my new 150V motor controllers (shameless plug: MC600SP and MC1000SP) with just the rear cells powering the car.
After verifying these were working reliably, I had a go building a 300V 600A controller based on the same design with IGBTs instead of MOSFETs. It worked well for a few KMs then died spectacularly - a cascading failure of all the IGBTs.. I was never sure if the design was going to be thermally adequate for IGBTs since on paper they produce about 3x more heat, and the heatsink housing certainly heated up quickly compared to the MOSFET versions. The other catch with IGBTs is that they don't parallel as well as MOSFETs. Generally have a positive thermal coefficient, meaning their conduction increases as they get hot and are prone to thermal runaway. Seems like IGBT-based controllers are best water cooled.
Anyway, it was an interesting experiment, but I decided it was going to be too troublesome to get my own IGBT controller working reliably after all, and about a week ago conceded to just putting the Zilla back in. Since then I've been putting it through its paces and so far so good - touch wood!! I have the Zilla programmed for 1200A motor amps and 500A battery amps, and it's got all the performance one would ever need on public roads, so I'll probably leave it like this for the next month or so until I feel confident to turn it up some more.
|
I also got some vinyl lettering done for the doors, so people actually know it's an EV! In case anyone else is looking for something similar, I used VinylLettering.com.au, and wouldn't hesitate to recommend them. Altogether a very painless process, using their web interface to create the order, pay with Paypal, and a few days later they turn up in the mail. Pictured right is the result. | 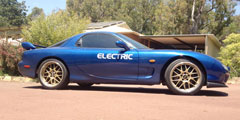
RX7 with signage on the door
|
1st January 2014 Update
The latest addition to the RX7 is an upgrade to my new CAN-based BMS and Electric Vehicle Management System (EVMS). The primary motivation was to get some instrumentation in the car, since until now I've been driving around without knowing exactly how much battery charge remained! The new system also allows viewing of cell voltages from the cabin, and automatic battery pack balancing. And of course, it is good to eat your own dogfood.
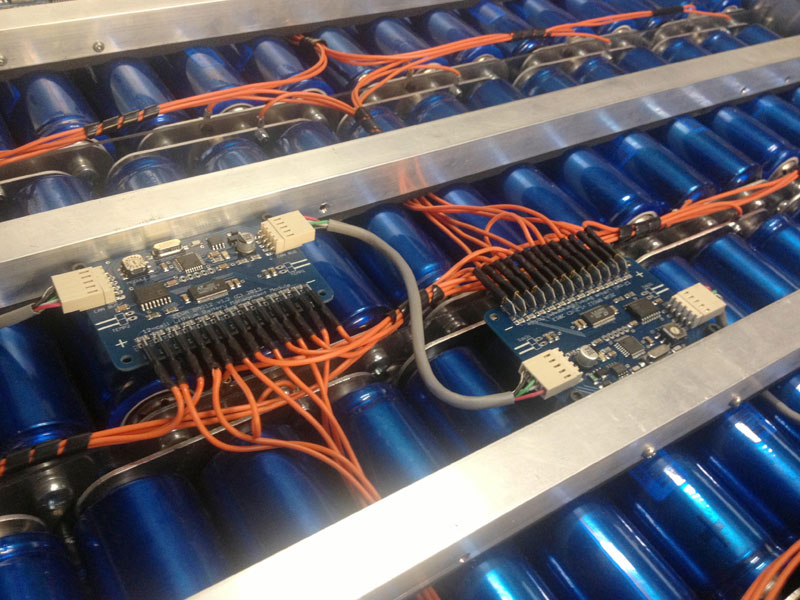
The most laborious job was replacing all the BMS wiring. The new BMS modules handle 12 cells each instead of 8, which for my 88S pack meant only 8 boards needed instead of 11 - but also meant most of the existing flywires were the wrong length, so I ended up re-doing the lot (and trying to be a little tidier this time).
I was extra careful doing the flywires because wiring mistakes or accidental short circuits can quickly cause damage. My procedure was to cut the wire to length, attach the quick-connect to the BMS end and wrap that temporarily in electrical tape while I attached the cell end (soldered into little ring terminals which were bolted to the cell interconnect plates). When all 12 flywires for a particular module were done, I would remove the tape and plug them in to the BMS module one by one, in order from most negative first. |

Closeup of new BMS12 modules
|
The new EVMS Core
|
The BMS modules communicate over CAN bus with a central control unit, the EVMS Core. The Core is basically a CAN-based BMS master unit plus instrumentation and a bunch of safety features (more info here). I installed this in the same place I previously had an EVMSv1.2. It did require a few new wires for the traction battery voltage measurement, current sensor and outputs to dash gauges.
There are also the two CAN bus ports at the bottom. One goes to the BMS modules in the front battery box, and the other to the EVMS Monitor installed in the vehicle cabin. (The CAN bus continues on from the Monitor to the BMS modules in the rear pack, since order of devices on a CAN bus is unimportant.) |
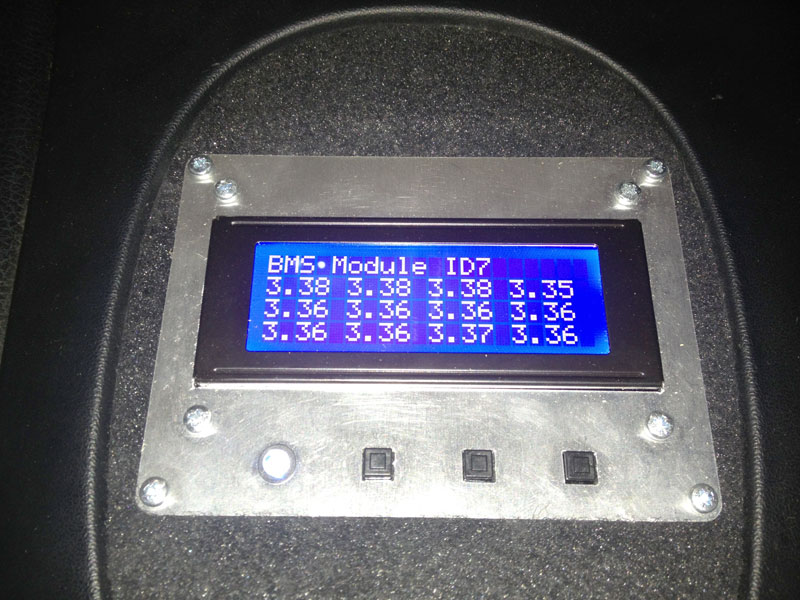
The EVMS Monitor device is installed in the space where the gear stick used to be (no longer there since the car is now direct drive / no gearbox). Shown here is the page displaying 12 cell voltages from one of the BMS modules. The Monitor can also display instrumentation such as traction pack voltage, current, power, battery state of charge, aux battery voltage, and HV isolation integrity.
So far the CAN bus comms seems quite reliable, with the voltages of all 88 cells monitored at about 2Hz. (The Core iteratively polls BMS modules at 16Hz so overall speed depends on how many modules are on the bus.) I'm not sure there's a great deal of practical value in being able to view all your cell voltages from within the cabin, but it is kind of nice for an idea of the state of balance, and quickly identifying any outliers. |

The Monitor in the cabin
|
Comments| | Alister on 24th Dec 2012
How exciting!
Will be fantastic to see how it performs.
I've read through your whole blog and the comments and I'm so impressed.
It is also my dream to build an electric car.
Nowhere near ready financially yet - so its great to see what other people are doing.
I love the goals of yours too - a really well performing desirable sports car - not a golf buggy type thing.
I live in Victoria and also greatly appreciate the lengths you go to to point out how to get a car registered in this country (even if there may be differences between the states).
The biggest bummer in my understanding when converting a car here is the need for a separate 12v battery rather than just a DC DC converter - horrible waste of space and annoyance with charging...
Anyway congrats on your progress - hopefully it will be a lovely (if a little late) Christmas present to yourself.
|
| | Robert Talty on 25th Dec 2012
Great work Ian, I appreciate the time and effort that you have put into properly documenting the whole conversion. I've actually been thinking about an Rx7 hybrid conversion whereby the Electric motors are only really used for low speed city driving say 1km electric range with max 60km/h on Electric power. Have you considered the Hybrid option? | | |  | | | Ian Hooper on 25th Dec 2012
Hi Robert, speaking for myself I'm definitely a fan of going 100% electric! They are much simpler, more reliable, and more efficient than either hybrids or traditional petrol vehicles. And of course when recharged from renewable energy, they are also the most environmentally sound option. But I recognise that some people do regularly drive long distances which EVs aren't yet capable of, and hybrids may be their best option.
Doing a hybrid conversion could be pretty difficult due to the combined complexity & space requirements of having both petrol and electric drive systems, plus managing the interaction between them. That said NetGain developed a fairly elegant solution a while back which involved an small electric motor spliced into the tailshaft of a RWD vehicle to supplement the drive system. They called it "EMIS" - may be worth a look! |
| | Robert Talty on 27th Dec 2012
Hi Ian, Thanks for the feedback. Actually I'm thinking about using hub motors so that much of the complexity is built into the wheel. For a very light host car a 4 * 7kW hub motors should meet the intercity travel needs. so if I eliminate power steering, I'll only really need a break master cylinder interface and some suspension tweaking for the extra wheel mass.
|
| | Ian Hooper on 28th Dec 2012
Sounds like a pretty challenging project! A lot of automakers tried getting hub motors to work for cars, but ended up going back to conventional drivetrains. The power density requirements make it quite technically challenging! It certainly seems like the holy grail of drivetrains though, maximum space efficiency etc. Good luck with the project :) |
|
| | Jessamy on 31st Dec 2012
I am very impressed, in years to come I would love to convert my mx6.. I shall continue following your bog :D Cheers Jess |
| | Mike Hill on 12th Jan 2013
Hi Ian,
As a fellow Perth EV dreamer (me, not you) I have been following your progress with great interest as I would like to do a conversion one day along the lines of the White Zombie and DC plasma cars.
On your first page you mentioned bringing some excitement to Australia.
Are you planning on taking the RX7 down to the motorplex for some time slips, and if so, any idea when? I would definitely be there for that.
Would be great to start an Australian NEDRA (ANEDRA?) but not many participants at this stage I guess.... Could be good though as it means you'll hold the record for a while. | | | | | | Ian Hooper on 12th Jan 2013
Hi Mike, yeah I'd like to take it to the drags sometime, though it may be a few months before I'm confident enough in the drivetrain. Quarter miles are probably the most brutal test of any car - pretty common for things to blow up! And I suspect I'd need to add series/parallel motor switching to maximise performance. My main interest though is in autokhana / track racing. The RAC driving centre is only 10Ks from my house and they run regular events / racing series for street vehicles. Hoping to get the RX7 involved in some of that.
Another event worth keeping an eye out for is the AEVA Electrokhana, usually held around March/April, which is an EV-only autokhana day. Usually attracts most of the interesting EVs from around Perth, and I'll certainly plan on taking the RX7 along. |
| | Mike Hill on 20th Jan 2013
Hi Ian,
Thanks for the info on the electrokhana, I will definitely keep an eye out for that.
I guess drag racing is a bit of a punishing on the car, and the main issue would be your diff and half shafts. Not sure how strong those are.
Providing traction becomes a "fusible link" before anything else it'll be ok.
I notice WZ went for a 9" quite early in its life due to twisted axles.
It's a shame about the hairball spoiling your first few drives.
Have you ever considered going any further with your own controller design?
Maybe changing to an IGBT output stage, and water cooling?
(Nothing against Zilla btw, it's obviously the benchmark)
Excellent job on the car too. Looks like quality workmanship from start to finish. |
| | Ian Hooper on 21st Jan 2013
The Gen 3 RX7 is reputed to have a very strong drivetrain, I'm less worried about any OEM parts as I am about the new Rotex coupler between motors and - perhaps most of all - the 1/4" key between rear motor and tailshaft, which seems very small to survive so much torque (a spline would be better).
The Zilla is still playing up unfortunately, looks like I might have to send the whole lot back for testing/repairs ($$$ in shipping and lengthy downtime). It's certainly got me thinking about building my own controller for the car instead.. |
|
| | Anthony on 21st Jan 2013
Good luck with it. |
| | Brett on 6th Feb 2013
Ian, this is an awesome build and great blog of the build process.
Love the efforts you have gone to and the quality. |
| | Matt on 3rd Mar 2013
Fantastic effort! Will we get to see it up close and personal at Electrikhana on March 10th? |
| | Matt on 3rd Mar 2013
Never mind, I should have read above more carefully first! Looking forward to seeing you and the car there! |
| | Eric (EVRIC) on 5th Apr 2013
Congratulations Ian. Great effort and great results - in the end! |
| | Martin on 23rd May 2013
Very impressive build and blog! Hope to see the car on the race tracks around Perth some day. |
| | Shane on 22nd Jul 2013
great build & craftsmanship there Ian.
Perhaps you could braze the coupler onto the shaft as this would provide a strong mechanical bond. the other advantages of brazing are that it would wick in between the shaft, coupler and keyway without causing heatstress like welding does. If you still need to remove the shaft you may be able to braze a boltable flange on instead. | | | | | | Ian Hooper on 22nd Jul 2013
Hi Shane, I did consider brazing the pieces together - in fact if the coupling fails again I might be inclined to try it! But luckily the new coupling from High Speed Engineering seems to be fine so far. I think it's mostly a case of more precise machining tolerances (since they did it on a CNC lathe). I should put a pic of the new coupling up.. it was very nice workmanship. | | | | | | Ian Hooper on 22nd Jul 2013
Oh, looks like I forgot to mention in this blog.. the drive coupling did come apart a second time, a few weeks after licensing. Upon closer inspection I discovered that the precision of the fit between the couping and output shaft wasn't great, so I ended up enlisting High Speed Engineering to make a whole new one. The one they made was a little beefier, made from 4130 steel, and comes apart in two halves with 6x M10 bolts holding it together so it's nice and serviceable. So far so good... |
|
|
| | Shane on 28th Jul 2013
Glad to hear that it's working well now. Looking forward to any more updates on your project.
At the moment I am looking into becoming a licenced certifying engineer to carry out EV conversions on bikes & cars. |
| | Dean Proudler on 21st Nov 2013
Ian, WOW! What a project!
You've inspired me to think about my own EV.
Out of curiosity, what performance are you getting out the car? 0-60? Range? Top speed? Charging times? Etc
Any information would be amazing!
Keep up the good work!
Dean | | | | | | Ian Hooper on 21st Nov 2013
Hi Dean, thanks for the kind words. Building your own EV is a big project but very interesting and rewarding! Currently 0-60mph for the RX7 is around the 6-7 second mark, but I still have the Zilla set for only 1200A max (i.e 60% of the 2000A max). It already has all the performance you'd want on public roads, but I might turn it up more if/when I start using it for motorsport. Range seems to be around 80km, which is a bit low, but I still only have 2/3rds of the battery capacity installed. (The battery boxes were designed for 88S9P but I started with 88S6P for weight and cost reasons). Since I use it on public roads I haven't tested top speed, but in theory it's about 150km/h - limited by motor RPM rather than power. Charging time is about 8 hours using the single phase (~2kW) Zivan NG3 charger. |
|
| | Alex Pfaffe on 17th Jan 2014
Fantastic report in your work. I've had a 93rx7 in my garage for at least
4 years since its engine blew waiting to become an EV. The details you have provided give me hope that I might actually see this happen sometime soon. Your car looks fantastic thanks for all the followup on how it has been driving as well. |
| | Alex Pfaffe on 21st Feb 2015
Hi Ian, my daughter is running a school project to convert the RX-7. As of last weekend we've actually started the RX-7 conversion having removed the engine. We are currently considering a single HPEVS AC76 motor. Would you have any feedback that would make this a bad choice for the vehicle? | | | | | | Ian Hooper on 23rd Feb 2015
Hi Alex, my main hesitation is that the AC76 would have significantly less power than the original engine - if you're converting an FD (series 6-8), it'd be about 1/3rd of the original engine's horsepower, so performance might be underwhelming! The earlier RX7s (say series 1-3) were lighter and less powerful though so the difference wouldn't be so stark.
You could of course get a much more powerful DC system for comparable money to the AC76 + controller (e.g a Zilla 1K and Warp 9 motor), but it would involve the usual trade-offs of no regenerative braking, and slightly lower efficiency.. so it depends on your priorities. |
|
|


